Wednesday, November 25, 2015

Extra Pecan Brown Butter Pie

Twas the day of Thanksgiving..and oh shit you forgot to make the pie! Well maybe you just got busy. Maybe you hate pie, but know that everyone else expects to have pie. Either way this Pie has become a labor of love for Chris and I. 

Two years ago he took me for lunch on my birthday to The Pit in Durham and the lady brought us this brown butter pecan pie for dessert. Both of us looked at this sloppy mound of "pie" and thought man we both are not fans of the overly sweet southern favorite. We wanted to be nice so we each had a bite...I'm not lying when we both met eyes we fell in love again! How could we have been so wrong! We were pecan pie believers!  We spent the next year trying pecan pies and not loving them nearly as much as the first one we had..what had gone wrong?! 

Well I got I work and found a simple recipe for brown butter pecan pie on the karo syrup site. It was alright but still way to mushy and sweet for our taste so I did what I do and tweaked it into submission and made it our own. We ate a LOT of pie during the "testing" phases but we found what we think is a winner!!! 

Here is "mostly mine but still kind of his too" fast and easy brown butter pecan pie!

Ingredients 

1 store bought pie crust ( yes you can make your own but I did say fast above!)

1 cup karo light syrup
1/2 cup brown sugar
1/2 cup granulated sugar
3 eggs
1 teaspoon coarse kosher salt
2 teaspoons vanilla bean paste
1/3 cup butter melted and browned
2 cups pecan halves
1 cup coarse chopped pecans


Put your butter in a small pot on the stove. Begin to melt it and as it melts you'll see the fat solids sink to the bottom of the pot. You want those become golden and toasty but not burnt. Make sure you watch this closely because it happens pretty quick. If you have any splattering it's going to be due to the water inside the butter, it should be very limited but don't freak out. Remember we want medium to low heat on this nice and slow is going to get the results we want. Once it's frowned turn the heat off and let it cool.

While your butter is cooling Combine the karo syrup and two sugars together to create a medium-size bowl. Then add in three beaten eggs and your vanilla, and stir to combine. 

Next we're going to add in our coarse salt and pecans. stir coat everything really good so it's a big sticky mess. 

Drizzle your brown butter over your sugar and pecans mixture and fold it will get to be light and fluffy, almost golden colored. You're doing it right!

Unroll your refrigerated piecrust into your pie pan and preheat your oven to 425. I know this is hot, but it's going to make all the difference in the world.

Pour your buttery sugary Pecan magical filling into your piecrust place in your preheated oven and bake for 10 minutes at 425. make sure you set a timer or you will have burned pecan pie!

After 10 minutes reduce heat to 325 and bake 45 minutes longer. Once done baking it should just slightly jiggle in center. Remove from oven and let cool or wait about 10 minutes and serve hot! 

Hope you enjoy this co-creation we have personally perfected. Thank You for all your love and support on this culinary journey. It's pretty special to do what you love for a living and you all help make the possible! 

Happy Cooking and Happy Thanksgiving!

Xo
Renee


Wednesday, November 18, 2015

Bringing a little taste of NYC to the NC

The reason I've been a little silent on the blog front is I've spent my summer traveling to new cities and trying all the local fair. Most recently I just got back from New York City. It was my very first trip and definitely a memorable one. I tried all of the local favorites and fell in love with so many great little spots and well-known hot spots too! 


I feel like I took 1 million pictures and realize that I am so that girl that doesn't let anyone eat at the table until I photograph their food… The struggle is real folks! One food I'm afraid the New York has ruined for me for life is bagels, they're just never going to be as good anywhere else. Our friends we are staying with turned me on to the Bialy at Brooklyn Bagel. This yummy treats is a cross between a bagel and an English muffin. It has this delicious little dollop of onion poppy seed goodness in the center. it's crunchy and savory and I won't lie smothered and crispy bacon scallion cream cheese I could eat that every day for breakfast for the rest of my life! 


After A lot of research I found a basic recipe that I've gone ahead and tweet and experimented with. So here's the step-by-step instructions. BE WARNED This definitely take some time and not for the faint of heart but worth it in the end!

Ingredients 
1 teaspoon olive oil 
1 1/2 teaspoons poppy seed
1/3 cup finely minced onion
1/2 teaspoon coarse kosher salt
7grams active dry yeast
1/2 cup warm water 110*- 115*
2 teaspoons sugar or honey
2 teaspoons kosher salt
1 3/4 bread flour
3 1/2 cups AP flour
1 1/2 cups warm water 110*-115*

Start with the warm water, yeast and sugar in your mixer bowl. Stir lightly to combine and let it sit.


Once it's done it's magic for about 15
Minutes it will get foamy and happy.


Now mix together in another bowl the two flours and salt. Add to mixer bowl and begin to blend with a dough hook attachment. 


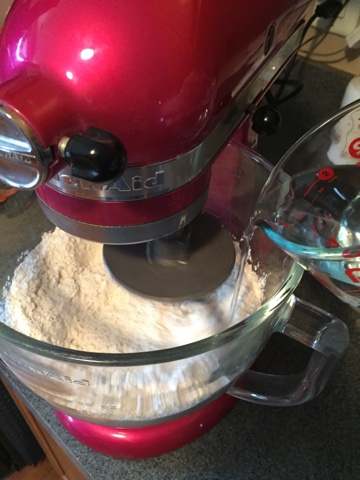
Drizzle in the remaining 1 1/2 cups of warm water while the mister is on low.


Let the mixer run on low until all flour is combined. Then turn to medium speed. 


Let this kneed in mixer for about ten minutes. You will know that it's ready for next step when it pulls away from the sides.


Based on your humidity level you may need to add a little more flour 1 Tablespoon at a time. Dough will be soft but you want it to be a little sticky.


Once done mixing remove from the bowl and transfer to a lightly olive oiled bowl to rest. I use one of these handle flexible dough scrapers when I bake breads of any kind.


Once in oiled bowl, turn it to cover all sides with oil and loosely wrap with plastic wrap and rest for 90 minutes! Patience is the secret ingredient!! 


After 90 minutes it will look just like this. Tripled in size! 


Now punch down dough and give it a flip. Cover again and let it rest for 45 minutes.


After even more waiting...punch down dough on a floured surface.


Roll dough into a log and using a pastry cutter cut into and roll into 8 almost equal balls. 


Cover with clean tea towel and let rest for 10 minutes.


While resting make your onion topping. I used a mini prep chopper to mince the onions. 


Then folded in the salt, olive oil and poppy seeds In a small bowl. Set aside so flavors can blend.


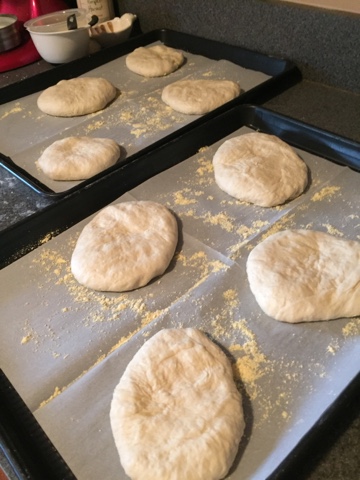
Press down into disks and place on in a parchment lined baking sheets dusted with cornmeal. Guess what...your going to cover with plastic and let them rest 30 more minutes! 


Make a indent in center leaving a good amount of edge around the center. 


And place a teaspoon of the onion poppy seed mixture in the center.


Dust with flour and cover loosely with plastic and rest final 15 minutes. We're almost there folks!!! Preheat oven to 425*


Bake 7 minutes then rotate pans and bake 5 minutes more. They should be just slightly golden.


Remove from oven and cool on wire rack. Once cooled you can slice them and toast. Smother with flavored cream cheese and enjoy!!! You can also use it as a sandwiches roll too!

Chef's Note: Next time I'm sure I would triple the dough and freeze the excess bialys so I have more yeild for all that waiting.

Happy Ccoking!


Tuesday, November 17, 2015

Make Ahead Corn Cassarole

 So I guess long time no post really can't apply if you haven't done it in six months. Hopefully you've all been following along on my Facebook page in the kitchen with Chef Renee. If you're not already liking it, go like and share with your friends! lots of tips and culinary adventures are posted on their daily.

 So I feel like we're right back where we started with Thanksgiving approaching next Thursday. We've talked lots of turkey on here and a few sides but I have one more to add to the list. One of the best things about making your own meal is that you can do somethings in advance so you're not so busy on Thanksgiving. Planning ahead means more time to drink more wine while basting the bird! 

One of the things I've learned the most about moving to North Carolina is if there some southern twist with Thanksgiving meal that once you try you can't go back. This awesome make ahead corn casserole is one not to be messed with your serving it on the big day or with just a pork tenderloin or some fried chicken legs it is a staple that you'll definitely be adding to your repertoire. So without further do here you go you'll be so mad at me that you ever tried this in the first place because it's THAT good!


First let's start with our ingredients
2 cups of corn fresh frozen or canned whatever you got 
2 eggs, beaten 
2 tablespoons unsalted butter 
3/4 cup of milk 
1 teaspoon salt
1 tablespoon flour
3 tablespoons sugar


Really that's it that's all that goes into this it's mostly pantry staples that you already have on hand so you probably will be using this again for a midweek meal

Preheat your oven to 350° and put your dry ingredients in with your corn. Start with the flour give it a good toss to coat all the kernels evenly. Then the sugar and lastly the salt. 

Next put your beaten eggs over corn and stir to coat.


Next mix in the milk.

And add in the glorious melted butter. Mix to combine. It will be a raw custard like mixture and look like this.


Pour into a baking dish. I used a oval stonewear baker on a baking sheet so as it cooks and fluffs up it won't make a mess in my oven.


Bake for 45 minutes and let it get golden brown. You can insert a sharp knife in the center to make sure the custard set. The knife will come out clean.


Serve right from oven or let cool to room temperature and cover with plastic and place in refrigerator. Place in warm oven and reheat along with your Thanksgiving day sides.

Happy Cooking!


Friday, May 29, 2015

Every bite is a Memory

Sometimes you have foods you love. Sometimes you have food that brings you pure joy! It reminds you of a time in your life where it was just simply good! As a child growing up in California, I was lucky enough to be exposed to amazing new cusines and cultures. It is no wonder I grew up to be a chef. 

My parents always made sure I never forgot where I came from and stayed true to my Midwestern roots. I was born in Ohio and truly it is "the heart of it all" it's where my heart is, with my amazing family that I had the joy of spending my summers with. My all time favorite food was not found in a five diamond restaurant, but a hundred year old farmhouse kitchen.

The sounds of good ol' country radio playing on a radio in the corner, George Jones or Willie Nelson. The sweet smell of lilacs and fresh cut grass in the breeze. My uncles blackened cigar smoke in the distance. It's hot and humid, the kind of sticky heat that only a Ohio summer can bring. My Aunt JoAnn stands at the counter in a cloud of flour. Telling me about their most recent adventures while cutting fresh juicy peaches into chunks and wrapping them in a dough of simply flour and milk.


The water bubbles and boils on the stove and jagged blobs of dumplings sink to the bottom of the pot. As they cook away the mixture of almost pasta like water with a ever so subtle smell of peaches perfumes the kitchen.my mouth waters and I eagerly watch as they are almost ready. 


Out of the pot and into a bowl topped with bread crumbs and sugar and drizzled with salty melted butter. A self admitted strange combination but it is literally my heaven on earth! They are more about the company Of who I share them with than the dish alone. Every time I have them I'm brought back to those sweaty sweet summers with my Aunt. 

She created those memories with her grandmother, and passed them along  with me. I'm forever thankful and blessed for these moments in the kitchen. She was here visiting and surprised me with making them in my kitchen this past weekend. The sights and sounds were all very different and we had so much food already... but all I wanted was that moment with her and my dumplings. I hope that I can make and create those moments with my own nieces and goddaughters.

Thank You for these moments Aunt JoAnn! Love you Always!!!

Tuesday, April 21, 2015

My Top 10 Kitchen Tool must haves plus a GIVEAWAY!!!!

Every chef has tools that they feel are must have in their kitchen. When a blog follower asked me what do they need to outfit their first kitchen, it got me thinking. What do I use the most? What do I think is a “must have” I have teamed up my friend Hillary with Pampered chef for a must have list as well as a giveaway drawing. All you have to do is like and share my In the kitchen with Chef Renee facebook page for one entry and for each item purchased your name will be entered 3 times in the drawing. So three items purchased 9 entries... Pretty cool huh? Well it gets better if you are the winner you get to choose your prize! 

You can shop by clicking the link below.You MUST select to have items to ship directly you. I'm keeping anything that shows up at my door:) 

The giveaway drawing will close at until midnight PST on April 30th, 2015 to shop, like and share. A winner will be announced on May 1st, 2015. Prize must be selected within a week or will be forfeited, and a new winner will be selected at random.

OK so now that formalities are done here is my top ten list of kitchen must haves!

 10.  Easy Read Measuring Cups: These little guys are a time and back saver for sure. You can easily measure out olive oil, stock or wine for your pan sauces. I like that they stack together to save space too.


9. microplane zester: Lemons, garlic, ginger, nutmeg… the sky is the limit for this workhorse in my kitchen. I also use it for fine shavings of chocolate, or Parmesan cheese, and cinnamon too!


8. Bamboo Spoon Set: If you read my blog you have seen these in almost every single post I have written. I love them they clean easy, they don’t stain and they keep your non-stick and stainless pans safe from scratches. They are a winner all day long.


7. Citrus Press: I’d say I’m pretty strong, but I like to make life easier where I can. These juicers will totally invert your cut citrus and get every last drop of juice out. Ours usually is found in the kitchen or our bar, as we like to use it for cocktails too!


6. Classic Batter Bowl: I LOVE this bowl! I got a pampered chef gift card about 8 years ago for Christmas, and got this beauty, and have used it almost twice a week since then and it is like new. I use it for pancakes, pasta salads, marinating meats and desserts. I have even used a hand mixer in it and it worked great. I like that it had a tight fitting lid so you can put it right in the fridge.


5. Handy Scraper: If you read my post on knife skills you know that scraping up food with your knife will ruin your blade. These scrapers are perfect for scraping up your cut veggies and scooping them into you pot or pan. It has a little silicon edge so it gets every bit. A clean cutting board is s safe cutting board. This is a must have!


4. Large Scoop: I have all three sizes of this scoop. I use the small for mini muffins and the medium size for cookies or meatballs.  The large size I use for ice cream, filling large muffin or pop over pans. I even use them for dispensing pancake or waffle batter so no more spills and drips all over the counter.


3. Prep Bowl Sets: Again you have seen these on the blog time and time again. I use these for my prep ahead so once I get to the stove or mixer everything is measured, chopped and ready to go. I’ll be honest if I don’t use these for baking I usually leave something out from tie to time… oops!


2. Stainless Whisk: You might be whisking eggs, whipping cream, or finishing off a pan sauce. You will need a sturdy strong whisk. This one is very comfortable in your hand, has a great weight to it and lots of loops, so it can get the job done faster for you!


1. Pocket Thermometer: Next to your knife this is one of the single most important tools you should have in your kitchen. No one likes undercooked chicken, mushy breads, and incorrect doneness of roast. Save yourself a ton of illness and hassle. If you only buy one thing from this list, make this be it!


If you have any questions about any of these items or need any other recommendations for kitchen tools beyond those featured here, feel free to drop me a comment.

As always Happy Cooking!

Monday, April 20, 2015

Chicken Marsala with homegrown shiitake mushrooms

The title of this one is a little misleading I know. Here are the facts. 1. This is chicken Marsala and 2. The mushrooms were homegrown... Just not my home! We have some amazing friends who gave growing shiitake mushrooms a shot this year. They got the logs, drilled the holes, and inserted the spores. Months later these amazing shrooms showed up at my home. 

Look at them they are by far the most amazing mushrooms I've ever laid eyes on! 

Anyways when the text came in from my hubby that our friend Joe had some of these for me I knew what was for dinner instantly. I thawed chicken breast and now had these beautys, chicken Marsala it is. Here is a very cliff notes ( I don't think these are even around anymore) version of mine since I usually don't measure, and make it from memory.


Ingridents

2 chicken breast, sliced in half lengthwise
8 ounces sliced shiitake mushrooms
4 tablespoons olive oil
4 tablespoons unsalted butter
1/3 cup plus 1 Tablespoon AP flour 
Salt 
Pepper
1/2 cup marsala wine
2/3 cup chicken stock
I clove garlic, minced
2 tablespoons shallots, minced

Ok here we go!

First salt and pepper your sliced chicken breast.

Then dredge them in flour, and shake off the excess.


Heat up the skillet with 2 Tablespoons of the oil and 1 Tablespoon of the butter. Let it get hot and foamy then carefully lay your floured chicken breast in.


Cook your chicken for 4 minutes, your shooting for a light browning and you will see the color change from translucent to opaque on the chicken about half way up.


Next flip your chicken breast over and cook for another 4 minutes ont he other side.


Remove the chicken from the pan and set on a plate. The chicken is not cooked all the way through yet. I repeat... The chicken is NOT cooked yet! 

In the same pan with the golden brown bits O' chicken, add in another tablespoon of olive oil and 1 more tablespoon of butter. 


Add in your sliced mushrooms. And arrange in as single if a layer as you can get. As Julia Child would say " don't crowd the mushrooms"


Cook them until they are golden brown and happy!


Add them to the plate with the chicken. The chicken is still not cooked yet! 


Now add the last Tablespoon of oil to the pan and sauté your shallots and garlic for about a minute. You just want them to softened a bit.


Next we are going to sprinkle the remaining tablespoon of flour over it and create a roux. 


Stir it to create a thick paste. This is going to thicken our sauce.


Add in The Marsala and chicken stock and whisk until it just begins to thicken.


Now back in the pan goes the chicken and mushrooms to cook with a lid on for about 10 minutes. Turn your heat down to medium for this step. 


Your chicken will nestle into the sauce and everything will get so yummy. Then right before you serve it remove the chicken breast and add in remaining butter.


Your sauce will get glossy and rich. Season with salt and pepper to taste. If it's too thick add a little more stock to thin it out.


I like to serve my chicken with whole wheat egg noodles to utilize every drop of the sauce. A sprinkle of parsley would be nice to, but I was not going out in a downpour just for parsley. 


Serve it up and if your REALLY lucky you will get a stellar review from your teenager as I did.

"it's amazing that a decomposer can taste so good"
- J. Burger

Happy Cooking!