Tuesday, December 16, 2014

French onion soup and the secret to perfect caramelized onions

This always seems to be a popular item to order when it's on a menu. French onion soup is both decadent as well as a comfort food. It also happens to be one of my parents favorite soups! It's not the quickest recipe but totally worth the wait. Simple and few ingredients make mine a great freezer meal as well.


The secret is perfectly caramelized onions. Some chefs short cut this process by adding sugar or honey to their onions, it gets results but not as good as this. Slow and steady wins the race and makes for natural sweetness that pairs perfectly with rich beef stock and wine.

Ingredients
6 Cups thinly sliced onions 
3 Tablespoons unsalted butter
2 Tablespoons olive oil
1 Tablespoon fresh thyme, chopped
1/2 Cup white wine or sherry
4 Cups Beef Stock
French bread
Gruyere cheese
Salt and pepper to taste


It all starts with onions..LOTS of onions. 

In a large pot melt butter and olive oil on low heat until butter begins to foam. By adding olive oil to the butter it will increase the smoke point (temperature at which fat begins smokes) Butter is normally very low and quick to brown but we want to maintain the richness of the butter and avoid browning it. By using the added olive oil it works like an insurance policy. 

Add all your onions to the pot and coat in fat. It will be almost to the top it they will shrink down as the first steam and then like magic they will begins brown. This whole process can take about an hour on low heat.

About 5 mins later you will see them start to steam and soften.

Once onions are reduced by about half the volume. Sprinkle in thyme and a little salt and pepper. Toss to coat.

The onions will start to be really soft an stringy like, and will start getting almost sticky.

Once you start to get sticky you will stir and see a little caramel colored film on the bottom of the pan. This is called the fond, and its like a powerhouse of flavor, so we want to use it as a building block to add depth to our soup. Just keep stirring an scraping every couple minutes.

They will start to get light brown bits through out the onions.

Then it will start getting an even layer of caramelizing on the bottom so keep stirring an scraping the bottom of your pot until deep golden brown. Be careful not to burn it.

Just like this! You can put these on anything from omelets to pizza, even over a block of Brie! 

Add white wine or brandy to the pan and deglaze. 
Make sure to get all that great fond off the bottom of the pan.


Pour in beef stock and put a lid on top and let simmer for at least a half an hour. The longer it cooks the better it gets.

Once it has simmered it will look like this. You could totally eat it just like this... But we're going to make it even better.

Slice some thick rounds of french baguette. Brush with olive oil and sprinkle with salt and pepper on both sides. Broil and flip till both sides are crispy and golden.

Ladle soup into a oven safe ramekin. Float a toasted baguette piece in soup and lay as much Gruyere on top as you like.

Place under broiler until cheese is melted into soup and golden brown.

Remove from broiler and let cool just a bit and then dig in! Its creamy, sweet, and like a savory bread pudding almost. Serve this with a crisp cool simple green salad and dinner is ready.

Happy Cooking!


Monday, December 15, 2014

Sesame beef lettuce wraps

Life just gets busy the past week and a half has just been just that. We had a rash of colds blow through our house, Christmas shopping, working, and just getting ready for all of this busy time all the celebrations! Our best friend truly can be a slow cooker at this point in the year. I utilize a crock pot pretty much every night that I'm at work year round. This way my family still has a good hot meal. It's something easy they just have to put the finishing touches on and still get baths and homework done while under daddy supervision. This recipe is great it's fast, delicious, and healthy.


Ingredients 

2 pounds top sirloin, large cubes
1/4 cup fat free low sodium beef stock
2 Tablespoons low sodium soy sauce
1 Tablespoon sesame oil
1 Tablespoon brown sugar
1 Tablespoon rice vinegar
1 Tablespoon ketchup or tomato paste
2 Tablespoons grated ginger 
1/2 a small onion grated
3 cloves garlic grated
2 Tablespoons sesame seeds
romaine hearts or steamed brown rice to serve with it.


Place beef in your crock pot

Assemble all the rest of the ingredients for your sauce. I love the frozen ginger in 1teaspoon cubes. It's a huge shortcut and since we don't use ginger that often I always have some on hand in the freezer.

I grate my garlic so it melts into the sauce

I also do this with my onion too!

Stir together your stock, soy sauce, vinegar, brown sugar, garlic, onion, sesame oil, ginger and ketchup. The sprinkle in sesame seeds.

Pour the sauce over the new and stir to coat.

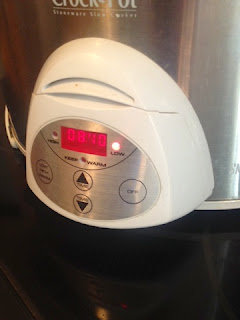
Set your crock pot to low and a timer for 6 hours. (mine is so over worked the display is not even working anymore..hint hint Santa!) By the time it is done you should be able to shred it apart with a fork. You can put it over rice and stir in some steamed vegetables or I like to low carb it and make them into lettuce wraps. Either way in 6 hours your house will smell amazing and easy Asian inspired dinner will be ready to eat! I'd have a finished product to show you but I'm sure it will be gone by the time I get home from work. 
A Happy full family = mission accomplished

Happy Cooking! 

Friday, December 5, 2014

Christmas Cookie Countdown: White Chocolate Peppermint Biscotti


Sometimes cooking is about more than just the end result. Sometimes it's about the journey getting there. When I cook in the kitchen it is a chance for me to relax, to do something I truly enjoy. The saying goes if you love what you're doing it never feels like work and being a chef truly is one of my most gratifying loves. One of the main reasons behind that is I never feel like I'm alone. I have all these bits and pieces of my history that surround me, and today I felt that more so than ever. 

I come from a family of amazing cooks and food has always been a huge part of my memories of each and everyone of them. I lost my grandpa Ramage when I was 11, and it was heartbreaking. However I'm honored to reach for his sifter that is decades old and his tried and true stainless mixing bowls. They make me feel like he is cooking with me and that we share this connection. 

I still use the measuring spoons from my very first cookbook my parents ever got me when I was a little girl. I feel all these things around me and so many wonderful memories come rushing back. I think that's truly what makes this time year so joyous. We are open to those memories and when we are really missing those that are no longer with us, they don't feel like they are so far away. Just some food for thought and something that made me smile this morning.

Today's recipe hits close to home with that. Sometimes it's not lifetimes but just pure miles that separate us from our loved ones. This is one that makes me think dearly of my favorite Italian family that I met when I was in high school. They had the most wonderful biscotti at Christmas time, lets be honest they had amazing food all the time at their house. Even though this recipe is not there's nor is it traditional, it still makes me feel like California is just a little closer. 

Ingredients 

1 stick unsalted butter
1 cup sugar
4 eggs
1 teaspoon pure vanilla extract
1/2 teaspoon peppermint extract
3 cups all-purpose flour 
1 tablespoon baking powder 
1 pinch of salt
1 cup white chocolate chips


Start off by creaming your butter and sugar in a mixer until fully incorporated.

Add in your eggs one at a time with your mixer on low making sure each additional egg is fully incorporated before you add the next one. (Our elf "Lunchbox" was watching closely from his marshmallow hot tub today!)

Add in your vanilla and peppermint extract and mix to combine. It should be like a thick liquid at this point.

In a separate bowl sift together your flour baking powder and a pinch of salt.

Add flour mixture too wet mixture in three increments with mixer Running on low. Fold in white chocolate chips. 

With floured hand separate the sticky dough into thirds and shape into rounds on un-greased or parchment lined baking sheets. Flatten down to about an inch thickness with your hands.

Bake in a 350 oven for 20 to 25 minutes until just golden brown around the edges.

Let cool five minutes and then with a sharp serrated knife slice into inch thick piece and place cut side down on sheet tray. Bake for an additional 15 minutes Until golden brown.

Let cool. You can spread on some white chocolate and sprinkles if you'd like, or leave them as is. Both are deliciously great and hot coco ready! I could not resist using those candy can shaped peppermint flavored sprinkles, aren't they cute!

You can also freeze in batches and giveaway as git to your neighbors. I'm saving one for the first snow day!


Happy Cooking!

Thursday, December 4, 2014

Christmas Cookie Countdown: Snowball Cookies


On the fourth day of Christmas my true love gave to me snow ball cookies! Okay traditionally they are called Russian tea cookies but I've always raise my kids that their Snowball cookies. This beautiful combination of butter, pecans and powdered sugar is so simple and easy to put together. Most the stuff you have on hand and the best part is you're not gonna have to run to the store for eggs because they're not in it. Score! 

I use my mini prep to pulse my pecans into a fine grind. You may notice that the amount of cookies pictured are less than what the recipe makes... that's because if I ate 12 recipes worth of cookies I'd writing a blog on diabetes and not cooking. Everything in moderation is always good folks.

Ingredients

1 cup softened butter unsalted
1/2 cup powdered sugar
1 teaspoon pure vanilla extract
2 1/4 cups all-purpose flour
3/4 cups chopped pecans
1/4 teaspoon kosher salt
Extra powdered sugar for rolling


Preheat oven to 400 degrees


Now you can use a hand mixer for this but really a wooden spoon and  your hands are the best tools you have. 

Mix together butter and half cup powdered sugar and vanilla in a large bowl. It will make a sandy like grit. 

Add and flour, pecans, and salt to your butter sugar and vanilla mixture. Stir just until it comes together. 

I switched my hand so I can really press it together. The heat from your hands will help soften the butter a little bit more and make it easier to work with.

Shape tablespoon amounts of dough into balls and place on a un-greased sheet tray. I use my silpat (silicon mat) just as an extra layer so they don't brown too much. 

Bake at 400° for 10 minutes only the bottoms will be golden brown and when they come off the sheet tray you have to be very gentle because the fall apart when transporting them to a wire rack.

Let cool for about five minutes and gently roll warm cookies and powdered sugar this will create almost like a melted glaze on the outside.


Oh but we're not done yet roll them a second time once they've cooled and the sticky sugar will help in here even more powdered sugar so go get a real snowball effect.


These cookies are so Rich. They are buttery, nutty and they are so delicate and beautiful they can even be used for tea party other times of the year. I hope your family enjoys them as much as we do.

Happy Cooking!

Wednesday, December 3, 2014

Christmas Cookie Countdown: Maui Oatmeal Sandwiches


Each year we try and incorporate a new cookie into our holiday repertoire. Last year we were reintroduced to the healthy version of oatmeal lace cookies by one of my favorite cooking blogs ever! Skinnytaste.com. These thin delicate cookies are great by themselves, but sandwiching two cookies together is always a extra good thing.  My daughter and I wanted to tackle this recipe last night, but with a few twists of our own to make it a little bit more Maui inspired. 

We added a little melted white chocolate spread in the center. We also went back to a classic more rich recipe incorporating lots of butter, brown sugar, vanilla and almond extract. Oh! we also added coconut to the Mix as well. You can even in add in ground macadamia nuts which would make this even more fantastic, we would have... but going to the store third time yesterday for this mama was not happening! 


Ingredients

1 1/2 sticks unsalted butter 
1 1/2 cups traditional oats
3/4  tablespoon of all-purpose flour
1/2 teaspoon salt
3/4 cup +2 tablespoons light brown sugar firmly packed
1 teaspoons vanilla extract
1/2 teaspoon almond extract 
1 egg lightly beaten
1/4 cup coconut shredded


On low heat melt butter, do not let it boil and make sure it cools a little before adding the next ingredient


Stir in brown sugar, flour, and salt until well combined. Add in vanilla and almond extract. Fold in coconut and Oats.


Once all above ingredients are combined stir in beaten egg.


Portion out 1 tablespoon size of batter and smooth flat with back of a spoon on a parchment or silpat covered sheet tray. Make sure to leave about 2 to 3 inches between each cookie they do spread and melt as they cook. These are going to be flat and thin.


Bake in a 325 oven for 13 minutes. Remove from oven and let cool on baking tray for about 5 minutes. Using a thin spatula slowly lift them up and transfer them to a wire rack to completely cool.


Once  your cookies are cool, you can melt white chocolate chips in the microwave in 30 seconds increments. stirring in between, to prevent burning. Smooth a thin layer of white chocolate on the bottom side of one cookie and sandwich with the other bottom they should look like little oatmeal sandwiches. (ignore my dirty stove, it did some work last night)


Store in a airtight container with parchment paper in between. They will get softer the longer they set, so eat within 2 to 3 days. Feel free to experiment with your add in's and  your sandwiched flavors. Pecans and melted butterscotch chips would be good too! the sky is the limit with these things. They are just so sweet and delicious!