Monday, April 20, 2015

Chicken Marsala with homegrown shiitake mushrooms

The title of this one is a little misleading I know. Here are the facts. 1. This is chicken Marsala and 2. The mushrooms were homegrown... Just not my home! We have some amazing friends who gave growing shiitake mushrooms a shot this year. They got the logs, drilled the holes, and inserted the spores. Months later these amazing shrooms showed up at my home. 

Look at them they are by far the most amazing mushrooms I've ever laid eyes on! 

Anyways when the text came in from my hubby that our friend Joe had some of these for me I knew what was for dinner instantly. I thawed chicken breast and now had these beautys, chicken Marsala it is. Here is a very cliff notes ( I don't think these are even around anymore) version of mine since I usually don't measure, and make it from memory.


Ingridents

2 chicken breast, sliced in half lengthwise
8 ounces sliced shiitake mushrooms
4 tablespoons olive oil
4 tablespoons unsalted butter
1/3 cup plus 1 Tablespoon AP flour 
Salt 
Pepper
1/2 cup marsala wine
2/3 cup chicken stock
I clove garlic, minced
2 tablespoons shallots, minced

Ok here we go!

First salt and pepper your sliced chicken breast.

Then dredge them in flour, and shake off the excess.


Heat up the skillet with 2 Tablespoons of the oil and 1 Tablespoon of the butter. Let it get hot and foamy then carefully lay your floured chicken breast in.


Cook your chicken for 4 minutes, your shooting for a light browning and you will see the color change from translucent to opaque on the chicken about half way up.


Next flip your chicken breast over and cook for another 4 minutes ont he other side.


Remove the chicken from the pan and set on a plate. The chicken is not cooked all the way through yet. I repeat... The chicken is NOT cooked yet! 

In the same pan with the golden brown bits O' chicken, add in another tablespoon of olive oil and 1 more tablespoon of butter. 


Add in your sliced mushrooms. And arrange in as single if a layer as you can get. As Julia Child would say " don't crowd the mushrooms"


Cook them until they are golden brown and happy!


Add them to the plate with the chicken. The chicken is still not cooked yet! 


Now add the last Tablespoon of oil to the pan and sauté your shallots and garlic for about a minute. You just want them to softened a bit.


Next we are going to sprinkle the remaining tablespoon of flour over it and create a roux. 


Stir it to create a thick paste. This is going to thicken our sauce.


Add in The Marsala and chicken stock and whisk until it just begins to thicken.


Now back in the pan goes the chicken and mushrooms to cook with a lid on for about 10 minutes. Turn your heat down to medium for this step. 


Your chicken will nestle into the sauce and everything will get so yummy. Then right before you serve it remove the chicken breast and add in remaining butter.


Your sauce will get glossy and rich. Season with salt and pepper to taste. If it's too thick add a little more stock to thin it out.


I like to serve my chicken with whole wheat egg noodles to utilize every drop of the sauce. A sprinkle of parsley would be nice to, but I was not going out in a downpour just for parsley. 


Serve it up and if your REALLY lucky you will get a stellar review from your teenager as I did.

"it's amazing that a decomposer can taste so good"
- J. Burger

Happy Cooking!


Wednesday, April 15, 2015

Epic Grilled Cheese!

I got totally inspired by my newest gourmet food find! Stonewall kitchen has been one of my favorite companies for Jams other than My hubby's grandma who we call Big G (she is this tiny little lady so it's funny!) she makes the best Jams ever. Her blackberry jam is the ONLY kind I will put on a peanut butter sandwich...like ever. 

Anyways back to my find, so here was my thought process. Maple Bacon Onion Jam! Amazing alone but what about on a grilled cheese? 


Next up the perfect bread to accompany the jammy goodness. Crusty Sliced French. Good chew and still nice and crispy on the outside.


Now for the cheese...this was a bit harder to decide. Sharp Cheddar? Good. Havarti? Good. But, Creamy suductive French Brie? You bet your Ass! 


So with those 3 it would be awesome alone but it can be so much more! I decided on adding in some Boars Head oven gold roast turkey too!


Now I'm sure we all know how to successfully build a grilled cheese. However this is not your everyday sandwich so gather everything up and get started.


First slater the insides of your bread generously with The maple bacon onion goodness. 


Slice up your Brie and lay it on the jam.


Pile on your roast turkey. If you happen to have some thinly sliced Granny Smith Apple, it will only make this cheesy masterpiece even better.


Butter your bread outsides, don't skimp here the only thing that makes this crispy and golden on the outside is the butter. Don't even ask about a substitute...I have non to recomend that would not compromise the flavor profile.


In a hot grill pan, lay a couple sandwiches on the pan and let it hang out for a bit. Butter the top sides. Try not to mess with it until it is perfectly golden brown with beautiful grill marks. Now you can give it a flip and admire your patience payoff.


Give the other side the same amount of courtesy and get golden brown.  Now I like to place my finished sandwiches on a cooling rack to avoid one size getting soggy from the heat. Let it sit for about 3-5 minutes. Move to a cutting board and slice it up.


Serve along side a salad and call it dinner! 


Happy Cooking!

* I was not sponsored or compensated by Stonewall Kitchen. I just like it...but if they want to give me free stuff to try, by all means I'm ready! 


Sunday, April 5, 2015

Not so Devilish Eggs

Happy Easter Friends! You have dyed all the eggs and you now have to find some way to use up all those hard boiled beauty's. Egg salad is always delicious but I have found after a couple days of lunches my family gets bored of it, and we end up throwing the rest out. However when they are deviled they seem to disappear like magic. So deviled eggs it is! In an effort to make them a little healthier I have swapped out some of the traditional ingredients. Hope you enjoy them. 

Ingredients 

1 dozen hard boiled eggs, peeled
5 Tablespoons non- fat greek yogurt 
1 Tablespoon Dijon mustard
1 teaspoon tiger sauce
1/2 tsp dried dill, plus more for garnish
1/4 tsp paprika, plus more for garnish
Salt and pepper, to taste


First start with peeling those little works of art, my son told me I was wasting his hard work...really?!


Then mash up the yolks into almost a dust. I use a whisk because it seems to be the best way to make quick work of the mashing.


Next add in your wet" stuff. The yogurt and Dijon mustard. Sprinkle on some salt and pepper. Swap out for a spatula, otherwise it will all get stuck inside your whisk. ( I did not do this at first and it was not fun trying to keep shaking it out... Eggs everywhere!)


Stir until it just becomes a thick paste consistency. Then sprinkle on your paprika, and stir. (notice the spatula?)


Next comes your dill. Stir some more, we want to incorporate lots of air so the filling will be light and fluffy.


Now for the hot stuff! I use tiger sauce because it's got good heat and it has a touch of sweetness. You can use your favorite. I also recommend Siracha. Stir some more.


Now once you've finished stiring it check for seasoning and add more salt or pepper if needed. It should be a nice wet paste, smooth of lumps and fluffy. 


At this point you cans spoon it back into the whites or use a piping bag and star tip like I did. If you don't have either, a zip lock bag with a cut in the corner will do just as good. Sprinkle with a little more dill and paprika and chill those puppies right up. They will disappear out of your fridge in no time.

Happy Easter and Happy Cooking!


Thursday, March 12, 2015

Chicken And Green Chili Enchilladas

I had promised this recipe early last week... However some much needed fun and shenanigans were happening this past week so I sure do hope these were worth the wait. 

These quick and easy Enchilladas are a far cry from authentic, but my family loves them. They have evolved over the many times I have made them and I don't have a real "recipe" but here is my take on them.


Ingredients

3 boneless skinless chicken breast
1 cup of frozen sweet yellow corn
4 ounces of softened cream cheese
1 small can diced green chilies
3 cups Mexican blend shredded cheese
1 large can Enchillada sauce
1 package corn tortillas
1/2 cup queso fresco cheese, crumbled


Boil your chicken breast in just enough water to cover them. This will take about 20 minutes or more based on how large they are. Remember if your not sure... Take their temp! 165 no less. 

Once chicken is cooked, shredded it and place it in a large mixing bowl. Add in corn and give it a toss.


Next add in the green chilies.


Then the sour cream and 2 cups of the shredded cheese. Mix everything together until combined. Now your ready to fill the tortillas.


Pour enough Enchillada sauce to coat the bottom of your baking dish. 


Next dip your tortilla in the sauce to fully coat. Yes you will get messy, but it's totally worth it! Place about 1/4 cup of filling in the middle of the tortilla and begin to roll one side towards the middle.


Keep rolling up like a cigar.


Carefully transfer finished roll to your baking dish seam side down. Roll and repeat until your out of filling or tortillas. (Apparently I feel this is a fancy project so pinkies up people!)


I usually get a couple pans of Enchilladas out of this mix, so if you use fresh (not frozen) chicken and corn you can freeze one for another day and just thaw and bake. Double dinners...score!

Once all your perfectly rolled Enchilladas are in the baking dishes top with remaining Enchillada sauce and remaining shredded cheese. 


Bake in a 375 degree oven until golden and bubbly.


Remove from oven and let sit for at least 5 minutes so they can set up a little. Top with crumbled queso fresco and sour cream. I also serve refried  beans and sweet corn cake because that's how we like it. Hope you enjoy them too! 

Happy Cooking!


Wednesday, March 11, 2015

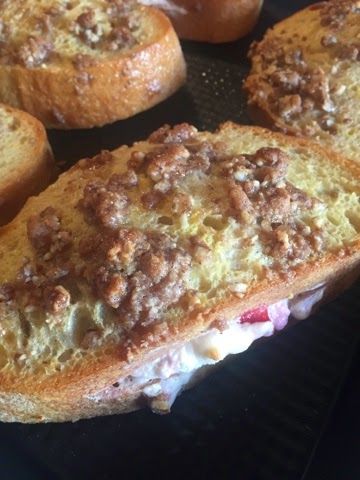
Strawberry stuffed French toast with crispy pecan crust

This has been the best week! My Best friend Janet flew in from LA to spend the week with us and we have packed so much into the last few days that I have been slacking on my B&B dutys. This creamy sweet fench toast is sure to score a positive review in my guest book!
I have also made this with bananas in place of the strawberries so use whatever fruit you have on hand.


Ingridents 

1 loaf crusty sourdough or French bread
1/2 cup whipped cream cheese
1/2 cup strawberries
1/2 teaspoon vanilla 
4 eggs
1/4 cup milk
1 teaspoon vanilla 
1/2 teaspoon cinnamon
1 cup pecans or almonds, chopped

First things first. Preheat oven to 350. Mix up all your fillings and have the dipping bowls ready.  In one bowl mix together cream cheese, strawberries and vanilla. In a second bowl whisk together eggs, milk, cinnamon and vanilla. In a third bowl place your chopped nuts. 


Slice your bread into inch wide thick pieces. Then take a sharp knife and in the underside of your bread make a two inch slit.


Carefully take the knife and run it inside the middle of the bread to make a pocket.


Now with a spoon gently put in about 2 Tablespoons of cream cheese filling in the pocket. Make sure it's not overflowing.


Now do the rest!


Move them over to your dipping bowls. First put your filled toast into the egg mixture. Shake off any extra and then lightly press into the nuts.


Now place them on a lightly greased baking sheet. Bake in a 375 degree oven for 20 minutes. 


Here is a finished picture. Post baking they will be golden and caramelized on the bottoms. The filling will be almost bursting out.


Top with a mound of butter and real maple syrup! 


Hope your next house guest enjoys them as much as mine did! 

Happy Cooking!