Thursday, March 12, 2015

Chicken And Green Chili Enchilladas

I had promised this recipe early last week... However some much needed fun and shenanigans were happening this past week so I sure do hope these were worth the wait. 

These quick and easy Enchilladas are a far cry from authentic, but my family loves them. They have evolved over the many times I have made them and I don't have a real "recipe" but here is my take on them.


Ingredients

3 boneless skinless chicken breast
1 cup of frozen sweet yellow corn
4 ounces of softened cream cheese
1 small can diced green chilies
3 cups Mexican blend shredded cheese
1 large can Enchillada sauce
1 package corn tortillas
1/2 cup queso fresco cheese, crumbled


Boil your chicken breast in just enough water to cover them. This will take about 20 minutes or more based on how large they are. Remember if your not sure... Take their temp! 165 no less. 

Once chicken is cooked, shredded it and place it in a large mixing bowl. Add in corn and give it a toss.


Next add in the green chilies.


Then the sour cream and 2 cups of the shredded cheese. Mix everything together until combined. Now your ready to fill the tortillas.


Pour enough Enchillada sauce to coat the bottom of your baking dish. 


Next dip your tortilla in the sauce to fully coat. Yes you will get messy, but it's totally worth it! Place about 1/4 cup of filling in the middle of the tortilla and begin to roll one side towards the middle.


Keep rolling up like a cigar.


Carefully transfer finished roll to your baking dish seam side down. Roll and repeat until your out of filling or tortillas. (Apparently I feel this is a fancy project so pinkies up people!)


I usually get a couple pans of Enchilladas out of this mix, so if you use fresh (not frozen) chicken and corn you can freeze one for another day and just thaw and bake. Double dinners...score!

Once all your perfectly rolled Enchilladas are in the baking dishes top with remaining Enchillada sauce and remaining shredded cheese. 


Bake in a 375 degree oven until golden and bubbly.


Remove from oven and let sit for at least 5 minutes so they can set up a little. Top with crumbled queso fresco and sour cream. I also serve refried  beans and sweet corn cake because that's how we like it. Hope you enjoy them too! 

Happy Cooking!


Wednesday, March 11, 2015

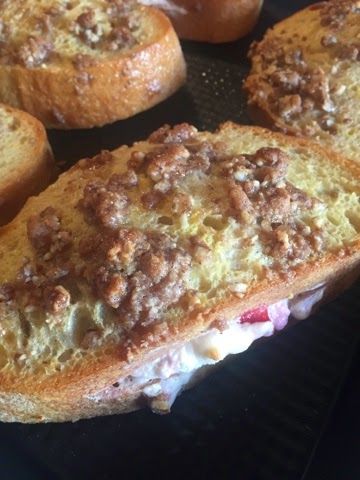
Strawberry stuffed French toast with crispy pecan crust

This has been the best week! My Best friend Janet flew in from LA to spend the week with us and we have packed so much into the last few days that I have been slacking on my B&B dutys. This creamy sweet fench toast is sure to score a positive review in my guest book!
I have also made this with bananas in place of the strawberries so use whatever fruit you have on hand.


Ingridents 

1 loaf crusty sourdough or French bread
1/2 cup whipped cream cheese
1/2 cup strawberries
1/2 teaspoon vanilla 
4 eggs
1/4 cup milk
1 teaspoon vanilla 
1/2 teaspoon cinnamon
1 cup pecans or almonds, chopped

First things first. Preheat oven to 350. Mix up all your fillings and have the dipping bowls ready.  In one bowl mix together cream cheese, strawberries and vanilla. In a second bowl whisk together eggs, milk, cinnamon and vanilla. In a third bowl place your chopped nuts. 


Slice your bread into inch wide thick pieces. Then take a sharp knife and in the underside of your bread make a two inch slit.


Carefully take the knife and run it inside the middle of the bread to make a pocket.


Now with a spoon gently put in about 2 Tablespoons of cream cheese filling in the pocket. Make sure it's not overflowing.


Now do the rest!


Move them over to your dipping bowls. First put your filled toast into the egg mixture. Shake off any extra and then lightly press into the nuts.


Now place them on a lightly greased baking sheet. Bake in a 375 degree oven for 20 minutes. 


Here is a finished picture. Post baking they will be golden and caramelized on the bottoms. The filling will be almost bursting out.


Top with a mound of butter and real maple syrup! 


Hope your next house guest enjoys them as much as mine did! 

Happy Cooking!


Wednesday, February 25, 2015

Creamy Dreamy Macaroni and Cheese

Macaroni and Cheese is one of my all time favorite things to teach people to make because it covers a LOT of classic techniques... And it taste delicious! 


Ingredients 
1 pound medium shells
12 oz. sharp cheddar cheese, grated
4 oz. unsalted butter
1/3 C flour
4 cups milk
1/4 tsp. freshly ground nutmeg
3 Tablespoons Dijon mustard
Salt and pepper to taste
Hot sauce if desired
1 Cup Panko bread crumbs
2 T melted butter
Paprika


First things first. You need to boil your shells in salted water. Follow your package directions. You can use any shape. I like the shells because they fill up with sauce nicely.


Next we are going to make our Roux. This is the same thing we did for the beer and cheese soup. Over medium heat, melt your butter until it is foaming and then sprinkle flour over it. Stir until it is thickened and just begins to bubble.


Now we will slowly add in about half the milk. It will get really thick really quickly. Then as you add the second half it will thin out.


Raid heat to medium high and continue to whisk to avoid any lumps. Cook until it is silky and thick.


A great way to test the thickness is to check with a wooden spoon, if it coats the back of it and holds a line it's perfect. Remove the sauce from the heat.


Here comes the "what is that I taste" part. I grate in fresh nutmeg and add Dijon mustard for depth of flavor. You can also add hot sauce at this point as well. 


Now it's time for the cheese!  Add in one third of the shredded cheese to the sauce and whisk. By adding in small batches you will get a smoother sauce and it will not separate into an oily mess. Continue with two more additions. Make sure each batch is fully melted before adding the next one. I used yellow and white cheddar because that what I had in hand. 


Now season with salt and pepper and paprika. Make sure you taste it at this point, if it's not to your taste now, it sure won't magically get more flavor as it bakes in the oven. Congratulations you just made a classic French mother sauce called a Mornay Sauce! 


Place your noodles In to a 9x13 cassarole pan or cooking vessel of your choosing. pour that glorious creamy sauce right over the top of the noodles and stir to get everything equally covered. Top with Panko bread crumbs and drizzle melted butter over the top. I sprinkle a little more paprika and salt and pepper on top. If you don't have Panko try crackers or pretzels that you have crushed up.


Bake in a 375 oven for about 30-35 minutes. It will be bubbly and golden brown on top. Ok now before you bake it you can top it with crumbled bacon and it's even more amazing! Or more cheese on top is never a bad thing either.


Let it cool about 5-10 minuets and serve alone as a main dish or as a side. Try different cheese too! Pepper jack makes for a great Mac and cheese. 

Happy Cooking!


Monday, February 23, 2015

Beer and Cheese... Ain't nothing wrong with that!


It's a cold rainy day here in the cakalacky, so comforting soup for lunch sounded just perfect to me. It's good to be back home and settling back to the day to day. I stocked up on a few different fresh Amish cheeses while in Ohio last week. O.k I actually bought a LOT of cheeses and herbs,snacks and all  at wholesale prices... yahoo!

Beer and Cheese are like Peanut Butter and Jelly to me, so this combo with some flavorful additions to make it even better.

Ingredients
4 Tablespoons Unsalted butter
6 Tablespoons All purpose flour 
1 large shallot, diced
3 medium carrots, diced
1 orange bell pepper
2 Cups Chicken Stock
6oz. Beer of your choice
6oz. Sharp cheddar cheese
A few dashes of Worcester sauce
Hot sauce to taste
1 Tablespoon smooth Dijon mustard


Melt butter over medium heat in a pot. Add in diced carrots, shallots and bell peppers. Toss in a big pinch of salt.


Sauté until carrots are softened. Then sprinkle flour over and stir for a couple minutes to create a roux. A roux is a thickening agent that will make the soup nice and velvety.


Let the Roux cook until it coats the vegetables and looks like a light paste.


Slowly add in chicken stock and stir or wish to reduce the possibility for lumps.


Add in Beer, and drink the other half that you did not use... No judgement here! 


Simmer for 10 minutes until slightly thickened. And stir in Dijon, hot sauce and Worcester sauce. Then whisk and let it bubble for 5 more minutes.


Now for the best part. Add in all that glorious cheesy goodness and whisk into warm liquid so it melts evenly. Pour into a bowl and top with more cheese or pretzels or croutons. The sky is the limit on toppings! Cozy up with a cup of it and stay warm:) 


Happy Cooking! 


Sunday, January 25, 2015

Individual Banana Chocolate Bread Pudding

II like to fly by the seat of my pants,  and I tend to be a little unpredictable sometimes. The biggest misconception to this is when I eat at a restaurant. There are 3 Things I will order if they are on the menu every single time! Risotto of any flavor, Duck Confit and Bread Pudding. The last being my most favorite dessert ever, so if they mess it up it is curtains on that place. 


I like to make bread pudding when I have extra baguettes laying around, however day old croissants make for a fantastic result too! You can really customize it to whatever you have on hand.

Cooking sometimes is about basics and then just "chefing" it up sometimes. Bread Pudding is no different it's always the same basic custard that you flavor accordingly and add any mix ins you'd like. 

Ingredients for basic custard

4 eggs
2 cups milk
1 cup sugar ( I used light brown)
1 tsp vanilla
1/2 tsp cinnamon
6 cups cubed and toasted bread

The following are your mix in's you can put anything in theses:

1/2 cup chocolate chunks
1/4 cup chopped spicy sweet pecans
1 banana diced


Gather all your ingredients so you'll be ready to roll.


Next combine your sugar, eggs, milk, vanilla and cinnamon together. Whisk until combined and then I add a small pinch of salt to balance the sweetness. 


Then add in your toasted and cubed bread pieces. It will look soupy at first but as it sits it will almost all be absorbed.


Add in your mix in's

Let it sit for about 20 mins to a half hour. This will allow enough time for the liquid to soak.

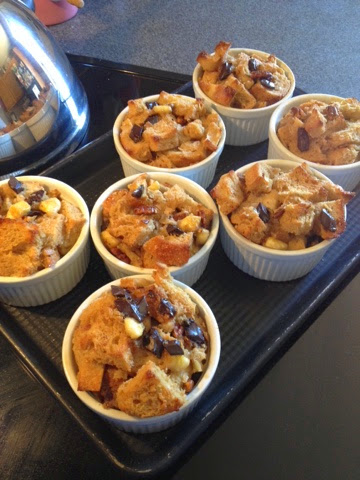
Like magic it's almost dry now. Next butter one large dish or small ramekins and spoon and press in as much filling as you can into them. They will puff up as they cook and then settle as they cool so place them on a sheet tray just in case they decided to flow over. 


Bake at 350 for about 35-40 mins. They will no longer be wet but nice and spongy with a crispy top. If you can wait let them rest for 10 mins. If not remove them and top with caramel sauce and whipped cream and have them for breakfast... Ice cream is also really good on them!


Happy Cooking!

Thursday, January 22, 2015

THE steak.

Only a few things can actually make me swoon, a perfect steak is one of my top three! We have all had a good steak at a nice high end steakhouse and thought that was pretty spectacular and all, but you will know if you have had THE steak. The kind of steak that is cooked so perfectly that it leaves you speechless. My perfect kind of steak has to have a good balance,  a crispy well seasoned crust, a soft bright pink center, and in some cases a rich sauce that leaves you wanting more.  This recipe has it all. Learn the steps to make a perfect steak at home, that taste better and is a fraction of the cost of a steakhouse.


Start off with your steak. you want a nicely marbled steak, this means nice and bright pink beef with lines of fat running through it. When I order out I usually go towards a fillet or a rib eye, that's just my personal taste. My hubs goes for a porterhouse and its just as amazing! You can cook any cut with this method just repeat to your self Fat = Flavor and your results will be awesome. I like thicker steaks because I think you can get a good crust to center ratio which makes me happy.


Season the hell out of them! It does not have to be 800 seasonings, just simple coarse salt and freshly cracked pepper are perfect. We want the steak to stand alone and we are simply trying to enhance the natural flavor of the beef, not hide it.


Get a heavy saute pan, I usually go towards a stainless or cast iron pan for steaks, You will get a much better crust than with a non-stick pan. Heat that baby up! You should only be able to hover your hand over the surface for a second because the heat will be radiating off it.


Add a neutral flavored oil. Canola or grapeseed are both good choices and have what is called a high smoke point. This means it will be able to handle a higher heat before it starts smoking. Once you add your oil it needs to heat up, a good visual for this is, as you tilt your pan you will see streaks or ripples in the oil. This lets you know that it is Go time.


Lay your steaks in the pan leaving enough room around them so they can cook with out touching. Once they are in the pan DO NOT MOVE THEM! Most people fall in to two categories the flippers or the trusting ones. I can guarantee you this, if you leave it alone magic will happen. The natural sugars in the meat will caramelize and the seasonings will form this sweet and salty crust, and it will all take place if you just leave it be. Proteins will let you know when they are ready to flip. Have ever cooked fish or chicken and half of it sticks to he pan? It was not ready. If you HAVE to peek, use a pair of tongs and gently lift a corner of the steak just enough to check if it easily is ready to turn, if there is any resistance or sticking, put it back down. This should take about 4 mins per side for nice medium-rare


Flip your steak and give it another 4 mins on the other side. One flip is all you get.


Remove the steaks from the pan, place on a warm plate and immediately tightly cover with foil for 10 mins. The foil will keep it hot and resting will allow time for all those beefy juices to redistribute throughout the meat.

while it is resting lower your pan heat. All that crusty bits in our pan are going to make the beginnings of this Brandy peppercorn sauce.  Those bits are what the french kitchen calls Fond. Fond is flavor. If you think about building a good dish you need different levels of flavor that build like a staircase. The fond is the first step, and we are stepping it on up to heavenly so we have a few more levels to add.


Brandy Peppercorn Sauce

1T. crushed peppercorns
2. T brandy (Bourbon would also be good)
3 T heavy cream
1 Cup beef stock
1 T unsalted butter
1/2 of a large shallot minced


if needed add a tablespoon more oil, only if your pan is dry. Now add in your minced shallots, we want to cook these until they are nice and soft. ( adding sweetness and a little bite from shallots, another level of flavor)


De-glaze. This means to scrape and incorporate the  flavors of the fond. We are using our Brandy for this. If your using a gas stove turn your heat off while you add it in, to avoid removing your eyebrows :) We are now going to cook this Brandy until it is almost evaporated, a matter of seconds really.


Now to add depth of flavor we are going to add a little beef stock, this will add volume and complement the beefy flavor of our steaks.


Now for our peppercorns. Crush them up just enough so you still have big pieces of peppercorns for your sauce.  Toss them in and again let it reduce by about half.


Now this is good as is, but we want to make it a little more luxurious. Add in the heavy cream. Stir to combine and them the butter. This technique of ending a sauce with butter is what will add that silky richness that will coat your mouth as you eat your steak. It creates the Wow! factor for your sauce. Taste for seasoning, which should be damn near perfect by now, but if you feel it needs more salt and pepper, feel free to make it to your taste. Let it cook and thicken until it coats the back of a spoon.


Remove foil and plate your steak. Drizzle your peppercorn sauce right over the the tops and enjoy. That my friends is what I'm sure heaven will be like.


Happy Cooking!